Showing posts with label Gradient. Show all posts

Monday, August 5, 2013

Rainbow nails

Some time ago I fell in love with rainbow nails. I wanted to try them out but somehow I didn't have patience to do them. So one day, when I was really really bored, I knew I had to give them a try. :P

It's all about gradient and with a perfect color combination you can make amazing rainbow nails. I wish I had a collection of neons, because you know how much I adore neons and rainbow neon manicure sounds awesome! :L

This is how my nails looked like more than a week. :$ 


Pinky: China Glaze - Spontaneous & Essence - Fall for me
Ring: Essence - Fall for me & China Glaze - For Audrey
Middle: China Glaze - For Audrey & Essence - Sunny Side Up
Index: Essence - Sunny side up & China Glaze - Peachy Keen
Thumb: China Glaze - Peachy Keen &; Essence - Very Berry 
Essence - Better than gel nails Top Sealer Fast Dry 


"Stop posing Ivana, scratch me!" xD

Did you ever try rainbow nails? :i

Xoxo,
Ivana :k

Sunday, February 17, 2013

NOTW #2 ~ Purple Glitter Gradient and Foil

Here's another Nails of the week post. :i I wore this manicure for a whole week because I loved it. I don't know why but I'm in love with glitter gradients lately and yes, I'm wearing one at the moment too. :$ They're easy to make but they look so stunning.

I decided to dig out the foil from Essence I already tried once for this cute manicure, as an accent nail. :D
 Nail Tek - Foundation II
Color Club - Vintage Couture / 2 coats
Sponging: Orly - Bubbly Bombshell & OPI - Servin' up Sparkle
Ring finger: Essence - Style me Love / 1 coat & Transfer foil set in Style me Pretty
Essence Better than gel nails Top Sealer
 
 Let me know how do you like it. :i

Xoxo,
Ivana :k

Tuesday, January 1, 2013

Beach Cruiser Make it Golden for 2O13

2O13 is here, can you believe that? :o I can't, time flies by way to fast as I'd want to. I had b-day on 28th December and I'm 24 now. Not that I feel old but...

...and that's who I am.
But what can we do. :i At least I got some pretty awesome gifts. :party

I didn't have to think twice what to wear for B-day. :L It was all about neon pink this year and I really started to love gold lately so here is a winning combination I'm still wearing. :)
OPI Nail Envy Nail Strengthener
Orly - Beach Cruiser / 2 coats
Sponging: Essence - Make it Golden
Essence Better than gel nails Top Sealer


What do you think? :)
...and that's who I am.
Hope you are too! Healthy, happy and full of love 2O13! :h

Xoxo,
Ivana :k

Tuesday, December 25, 2012

Once Upon a Time I Made it Golden for Christmas

Did you miss my nails? :$ I did miss you! :)

My nails are in worst condition - still peeling and weak so I'm keeping them short. I'm still painting my nails all the time, I just don't find time or great light to take photos that's why I'm not posting as much as before..

Here's my easy red and gold Christmas combination you can't go wrong with. :D Pictures aren't best but you get the point. :i
OPI Nail Envy Nail Strengthener
Sponging: Essence - Make it Golden
Essence Better than gel nails Top Sealer 


Do you like this combo? Let me know what are you wearing today! :party

Xoxo,
Ivana :k

Saturday, October 13, 2012

Bloody Manicure for Halloween

It feels like I didn't update my blog for ageees but I just didn't have time or inspiraton so I took a break. Of course I was painting my nails and if you follow me on Instagram - ivanathinkspink - you already saw all the manicures I'll post in the near future. 

Bundle Monster is having a Halloween contest and I really wanted to join but the final outcome wasn't so awesome as I thought it will be. I didn't have time to recreate it so today I submitted my entry. Here it is... Idea on my ring finger was something I was expecting to be much better as it is... I wanted to look like I have a zipper on my nail and it's all bloody when you open it. :D


 "Blood" and stitches were made with PS. I just had to play with photo a bit more to make it more interesting. :D
Pinkie: Gradient with Essence - Back to the 50s & Manhattan - 1010n 
Ring finger: Essence Cafe Olé, BM-202, Essence - Back to the 50s and BPS black stamping polish
Middle finger: Gradient with Essence - Back to the 50s and Manhattan, BM-223 and BPS black stamping polish
Index: Manhattan 1010n and BPS glitter
Thumb: Essence Cafe Olé & Essence - Back to the 50s, dotting tool

In case you like my manicure, you can vote for me once a day here
http://apps.facebook.com/contestshq/contests/293918/voteable_entries/59927280
Or if you don't have FB here:
http://promoshq.wildfireapp.com/website/6/contests/293918/voteable_entries/59927280

Let me know if you like it! Have a lovely weekend and thanks for reading!

Xoxo,
Ivana :k

Tuesday, September 18, 2012

Video Tutorial: Harlequin Hardware Manicure

Since I got so many lovely comments on this manicure I showed you here and I didn't really know if I should continue with tutorials or not, I decided to try it again. Same steps like the first time, I just changed a pink polish I used before.

Harlequin Hardware Manicure :L :
Daylight
Essence Nail Art - Protecting Base Coat
OPI - Sweet Heart / 2 coats
Sponging: OPI - Sweet Heart & Catrice - Princess for a Day
Essence - High Shine Top coat
Funky french: China Glaze - 2030 & Stripping Tape
Essie - Good to Go


You can also stop when you're done with sponging, I love how this kind of gradient looks like. :)

Daylight
Let me know if you like the tutorial. :$

I'll keep it short and simple for today, thanks for reading! :h

Xoxo,
Ivana :k

Wednesday, September 5, 2012

Video Tutorial: Gradient Nails

I wanted to film how I do gradients on my nails and since I loved my orange and pink gradient I did a while ago I decided to recreate them. Here's a video...


Same polishes used as before, just a bit different technique and reverse version. I prefer applying polish directly to the sponge, I find it way easier. Pictures...

Essence Nail Art - Protecting Base Coat
Essence - High Shine Top coat

If you have any questions let me know! Do you love gradients? What's your favorite color combination??

Thanks for reading!

Xoxo,
Ivana :k

Saturday, July 28, 2012

Inspired by: Harlequin Hardware Manicure

Did you ever heard for Harlequin Hardware manicure? Well I haven't but I saw pictures on Tumblr all the time. :D Here's a picture...
http://makeupforlife.net
“Harlequin Hardware” manicures created by CND‘s Candice Manacchio at the Diego Binetti show. To create these gorgeous looks, Candice stained models' nails in CND Colour in Raspberry Parfait and Frosting Cream before capping them in gold and silver metal.
The gradient looks so perfect and airbrushed on pictures and I already knew I won't get same smooth effect but I really wanted to try it out. :D Tips are probably mirror gold stickers, as you can see on her pinkie it started lifting. :i

It looks much better from far away as on macro photos. :i


First I started with 2 coats of OPI Sweet Heart. Then I applied Sweet Heart and Hot or Not? on sponge and started sponging pink near the cuticles and blending pink with the lighter color. It's even messier than a normal gradient, because you need to be careful not to get pink in the middle of nails. I literally had pink fingers all around cuticles. :) Then I add just Sweet Heart on sponge and tapped it in the middle of nails in case there were pink spots. I added coat of top coat and left it for a day. Yesterday I made gold french tips with China Glaze 2030 and stripping tape and finished everything with another coat of top coat.

Without Golden Tips
I got so many compliments and lots of them were wondering if my nails are fake or how I did them. :)
Sun
OPI - Sweet Heart / 2 coats
Sponging: OPI - Sweet Heart & Catrice - Hot or Not?
 Beauty Secrets TC Fast Finish Polish Dryer
Funky french: China Glaze - 2030 & Stripping Tape
Beauty Secrets TC Fast Finish Polish Dryer

Yup, gradient effect is grainy if you look closer but I don't care, it's still pretty. ^_^
This technique is a bit messy and time-consuming but when you're done, you have a pretty awesome manicure going on your nails. :L

Btw, follow me on instagram @ivanathinkspink, I joined a few days ago . :)

What do you think? Would you wear it? :i Thanks for reading! :h

Edit - 18th September 2012 ~ Adding video tutorial :)


Xoxo,
Ivana :k

Sunday, May 27, 2012

Bloom-a-Loom & Forget-me-Not Gradient

Gradients, gradients... We're seeing lots of great gradients everywhere. :D I usually get bored with a new trend quite fast but gradients still rock my world. So I decided to make another one. x)

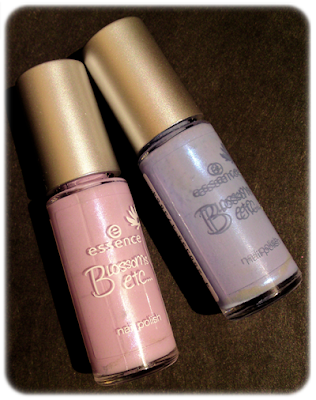
Blossoms etc... TE from Essence was available more than 1 year ago and I didn't have a chance to use them before. I still remember going to the store to pick them out, when they showed up. :D So when I was searching for a perfect combo, I knew they're meant to be together. :D
Essence - Bloom-a-Loom & Forget-Me-Not
Bloom-a-Loom is a warm lilac polish with a lilac shimmer, Forget-Me-Not is a stunning periwinkle blue with a blue shimmer. Both are really gorgeous and the shimmer isn't super visible on the nail, but it's there, especially visible on sun in person. :L

I started with 2 coats of Bloom-a-Loom and then I sponged both. I just made an accent nail on my ring finger with a reverse combo. :)
Daylight
Sun
OPI Nail Envy Nail Strengthener
Essence - Bloom-a-Loom / 2 coats
Sponging: Essence - Bloom-a-Loom &; Forget-me-Not
Beauty Secrets Top Coat Fast Finish Polish Dryer 

It's maybe not bright enough for what I want on my nails right now (I'm really in the mood for neons at the moment) but I still love this color combination. :L

What do you think? Did you already master this technique? You're not familiar with this technique? - Well, check Sammy's tutorial here and start sponging! :)

Just came home after watching Eurosong with my BFF. :) Congrats to Sweeden of course, but my winner is Željko Joksimović and his absolutely amazing song and voice! <3
Idi, samo, samo idi, tamo. Leti, pevaj, srce drugome daj, al' znaj, da zbogom nije kraj. Nije moja ljubav stvar, pa da neznam šta ću s njom, želim ti sve najbolje, ova ljubav samo moj je brodolom.
Have a lovely weekend! <3

Xoxo,
Ivana :k

Saturday, May 12, 2012

Señorita Bonita & Forget Now Gradient

Gradient is a new huge trend going on right now so I definitely will make more gradients in the future, because I'm really a big fan! It looks like your nails were done by professional, but all you need is a piece of sponge, 2 or more polishes and you're ready to go. :i

When my previous manicure started chipping, I decided to upgrade it with a gradient. :L Since I already had this blueish pink, I decided to go with a pink and purple.
The purple I used is Señorita Bonita from China Glaze's Summer Island Collection (really gorgeous purple with tiny pink flakes), the pink is Forget Now from Sinful Colors. First I wanted to use 108 Degrees, also by China Glaze, but since I spilled out a few ml of this gorgeous polish, I checked my stash and found a dupe, yay! So yes, 108 Degrees and Forget Now are really really close. :)

I think I sponged 3 times, mostly because I wanted to cover my ring finger with Waking Up in Vegas, but 2 would be enough on other nails.

I just love this blurry picture I took. <3
Daylight - Blurry
Daylight
Base:
OPI Nail Envy Nail Strengthener
Ring Finger: Essence - Waking up in Vegas / 1 coat 
***
Sponging: China Glaze - Señorita Bonita & Sinful Colors - Forget Now
Beauty Secrets Top Coat Fast Finish Polish Dryer 

I just love how these 2 looks together! It looked even yummier as a base color I had on before sponging. :L Sometimes it looked like I was wearing a duochrome. :)

What do you think about this color combo? :) Did you already master this gradient technique? :) If you're searching for a tutorial, don't forget to check Sammy's amazing tutorial!

There's still time to vote for BM's contest, you can find the links in the right sidebar or in my previous posts! I know I'm spamming you with these links all the time. :$

Have a lovely weekend and thanks for reading!

Xoxo,
Ivana :k

Tuesday, May 1, 2012

Blue & Turquoise Gradient Nails

Can you believe it's already May here? :o Time flies by so fast....

I have another gradient manicure for you. :) I must say I'm really loving this trend, because they look so amazing and I got lots of compliments when I wore them. :$

Last time I picked a pink that was really hard to capture on picture and this time I picked a turquoise that looks blue on the pictures but I really hope you can see 2 colors on the pictures below. :D

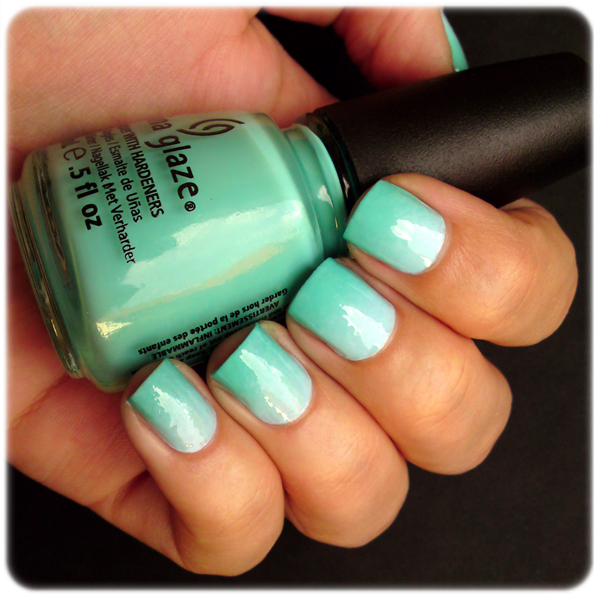
Anyway, I applied a turquoise (China Glaze - Aquadelic) and baby blue creme (Essence - Fall for me) polish on the sponge and sponged it directly nails, moving the sponge a bit up and down while pressing so the colors really mixed together on the nail. I repeated this step 3 times to get a bit more opaque colors.I think I should add another coat but it looks better in person as on picture (I still can see some bald spots here and there).
Daylight

Sun
Here's how I applied 2 colors on the sponge. :)


Sponging: China Glaze - Aquadelic & Essence - Fall For Me
Beauty Secrets Top Coat Fast Finish Polish Dryer

There's a lot of techniques to do a gradient effect. You can do it like I did, or you apply one color and sponge the second on the tips,... I really love this tutorial from Sammy at The Nailasaurus so you should really check it out to see how she does it. I'll definitely try her method soon. :e

What do you think about today's color combination? Like it or not? :)

Have a lovely week and thanks for reading!
Xoxo,
Ivana :k


Sunday, April 29, 2012

Pink & Orange Gradient Nails

I'm a big fan of sponging so I had to try out this technique too, because the final result is just so pretty. :)

I'm talking about gradient nails, which are very easy to make but they look so gorgeous! This is the first time I tried it and I think I'll do more in the future. I only have one crappy picture, because Fancy Fuchsia is really hard to capture and all pictures are even worse and color inaccurate. :/
Daylight
I saw this technique with 4 colors a while ago on YouTube, but since my nails are short, I decided to go with just two - pink and orange. :)
The secret is applying both colors on the sponge (I'm using kitchen sponge). Then you press the sponge on the surface (paper, foil, plastic cup,...) to remove excess and sponge your nails. This is how you get a thin coat with gradient effect. To get a full opacity, you should re-apply nail polish to the sponge and do the same steeps couple of times but always wait till bottom layers are almost dry so you don't ruin it.
I also tried it without pressing the sponge on the surface first. I sponge directly on the nail and move the sponge a bit up and down so the colors really get mixed on the nail and you get a bit more opaque coat, which I prefer a bit more. :)
When you're done, don't forget to clean up your cuticles, because they can get really messy, apply a coat of top coat and you're done. :)

 OPI Nail Envy Nail Strengthener
Beauty Secrets Top Coat Fast Finish Polish Dryer

What do you think about gradient nails? Do you like them?

Have a lovely Sunday and thanks for reading! :)

Xoxo,
Ivana :k