Showing posts with label Nail Art. Show all posts

Monday, August 5, 2013

Rainbow nails

Some time ago I fell in love with rainbow nails. I wanted to try them out but somehow I didn't have patience to do them. So one day, when I was really really bored, I knew I had to give them a try. :P

It's all about gradient and with a perfect color combination you can make amazing rainbow nails. I wish I had a collection of neons, because you know how much I adore neons and rainbow neon manicure sounds awesome! :L

This is how my nails looked like more than a week. :$ 


Pinky: China Glaze - Spontaneous & Essence - Fall for me
Ring: Essence - Fall for me & China Glaze - For Audrey
Middle: China Glaze - For Audrey & Essence - Sunny Side Up
Index: Essence - Sunny side up & China Glaze - Peachy Keen
Thumb: China Glaze - Peachy Keen &; Essence - Very Berry 
Essence - Better than gel nails Top Sealer Fast Dry 


"Stop posing Ivana, scratch me!" xD

Did you ever try rainbow nails? :i

Xoxo,
Ivana :k

Tuesday, September 18, 2012

Video Tutorial: Harlequin Hardware Manicure

Since I got so many lovely comments on this manicure I showed you here and I didn't really know if I should continue with tutorials or not, I decided to try it again. Same steps like the first time, I just changed a pink polish I used before.

Harlequin Hardware Manicure :L :
Daylight
Essence Nail Art - Protecting Base Coat
OPI - Sweet Heart / 2 coats
Sponging: OPI - Sweet Heart & Catrice - Princess for a Day
Essence - High Shine Top coat
Funky french: China Glaze - 2030 & Stripping Tape
Essie - Good to Go


You can also stop when you're done with sponging, I love how this kind of gradient looks like. :)

Daylight
Let me know if you like the tutorial. :$

I'll keep it short and simple for today, thanks for reading! :h

Xoxo,
Ivana :k

Saturday, September 1, 2012

Video Tutorial: Funky French with Tickle my Triangle & Dionisio

The other day was really sunny and I needed a quick manicure so I picked one of my favorite polish I own. I got this polish from Kvacka (thank you :h) and I still can't believe I finally own it. I'm talking about Tickle my Triangle from Kaleidoscope collection. I'm so happy I own this one and How about a Tumble.
Sun
I added 3 thin coats, it dries super fast and it looks gorgeous! Of course you have to take blurry pictures to capture rainbow but it's still way too beautiful in person. :L

Sun - blurry
China Glaze - Tickle my Triangle / 3 coats

Then I decided to experiment with my phone again so I tried to film how I usually do a funky french. I change an angle of filming so I hope you can see better. I use striping tape for any kind of french manicure, because it gives reall precise line on tips.

Only problem now was editing text, because I didn't realize it doesn't show up great because of the too bright lightning and white text isn't really visible.I could change it but it took almost 8 hours to upload on YouTube and I don't have patience to wait again. :/


And a picture...
China Glaze - Tickle my Triangle / 3 coats
Funky French: Hits No Olimpo - Dionisio
Essie - Good to Go

Letme know what do you think about this video! As always, I would love to hear your feedback! :h Thanks for reading!

Xoxo,
Ivana :l

Monday, August 27, 2012

Video Tutorial: Saran Wrap Nail Technique

If you follow me on instagram you would know I made my first video tutorial. :$ I spent hours on basic editing and almost gave up when my lap top died in the middle of saving. It also took so long to upload on YouTube and the video is less than 2 minutes long.

This is my first video tutorial so be nice. ^_^ I'm not super satisfied but for the first time I did more than great. Main problem I have with this video is the angle of filming but I didn't want to rotate it, so I just left it like that and played with editing. Next time, if there will be next time, I know how to film. :i

This is one easy tutorial of Saran Wrap Technique I tried the other day and of course there's tons of tutorials around. :i
China Glaze - Love's a Beach / 2 coats
Beauty Secrets TC Fast Finish Polish Dryer
Piece of Saran/Cling Wrap & China Glaze - Snow
Essie - Good to Go


Enjoy! :$


Leave comments here or on YouTube, rate and subscribe if you would love to see more tutorials. I'd really love to hear your feedback. Is there a tutorial you would like to see? Please let me know and I'll do my best.:)

Thanks for watching and reading! :i

Xoxo, 
Ivana :k

Tuesday, August 21, 2012

Inspired by: Norman Ambrose Spring/Summer 2012 Nails

Lately I'm so lazy with my nails so I wear same manicure for a week or before it's totally unwearable. :P

I had this picture saved on my laptop and when I got some things from Born Pretty Store for review I knew I'll have to try it out. Here's a picture.... :i

http://nailshowto.com
CND Colour in Flashpoint iced with 24K Gold Leaf as a french tip made by nail artist Candice Manacchio for CND.
My nails for sure aren't oval as these so I made a regular french tips with a gold foil because I obviously don't own real gold leaf. :P Here's what I came up with.. :i

Not really super close because my nails are squared but I like it! First I didn't want to use a coral red because I don't like corals and I thought I don't have corals in my stash but then I remembered I got one from Nina months ago so I decided to get close as I can. :)

I got a set of gold and silver gold nail art foil. You get 6 retainers of gold and 6 of silver foil. Foil is really thin so you have to be careful if you want to apply it in one piece but I needed smaller pieces so I took my tweezers to tear it apart without getting it on my fingers.

First I applied two coats of Perfect nail polish in #233, which is a coral creme. When the second layer was still tacky I placed pieces of foil on my tips with tweezers. When I was done, I sealed the foil with topcoat. 
Daylight
Perfect - #233 / 2 coats
Gold Nail Art Foil
Beauty Secrets TC Fast Finish Polish Dryer

I love how sparkly it looks on sun like I dipped my nails in a gold.
Sun - blurry
So what do you think? Yay or nay? :) I definitely need to try this with pink! If you don't like foil, you can always try french tip with a gold glitter.

I saw top coats with gold pieces inside, I'm quite sure you can mix this foil with a clear top coat and made your own golden top coat. Or you just randomly place pieces of foil.  .i Has anyone tried this yet?

Don't forget to use code J10X31 to get 10% off on your order if you're planning to order on Born Pretty Store . ;)

An extra photo I just published on Instagram, trying to pose like the models did. :P


Xoxo,
Ivana :k

*Some of the products in this post were sent to me by Born Pretty Store! For more information read my disclosure policy!

Wednesday, August 8, 2012

Inspired by: Leopard Print by Chalkboard Nails

This time I was inspired by a fellow blogger Sarah at Chalkboard Nails, who definitely is one very talented lady. :h Her blog is just amazing and full of inspiration! I needed a quick manicure so I went with an easy Leopard print tutorial.

I'm not really a fan of freehand nail art, because I want everything to be perfect, so when I was done, I wasn't really liking it at first. :i
Essence Nail Art - Protecting Base Coat
CH Nail - #14 / 2 coats
Leopard Print: Dotting tool + China Glaze - Snow & BPS  black stamping polish 
Beauty Secrets TC Fast Finish Polish Dryer
 
Daylight
Here you can read Sarah's post. I added her tutorial below if you haven't seen it already:


Very simple version of Leopard print if you prefer freehand nail art, all you need is a dotting tool and 3 colors of your choice. :D

Let me know what do you think! Thanks for reading! :h

Xoxo,
Ivana :k

Friday, August 3, 2012

Inspired by: Sophy Robson EEK Nails

Yap, another inspired by manicure. :) Thanks to everyone who left a comment on my last post, I was so happy when I saw you like it so much and I didn't expect a feedback like that. ^_^

I tried to find more manicures and when I saw this manicure, I had to try it out. It's simple but cute! :L

Here's a picture:
http://www.sophyrobson.com
This manicure was done by successful Sophy Robson, who paints the nails of celebrities. :) All the colors were made just for the Giles SS11 Show.

I tried to match the colors but I just couldn't find any similar blues in my stash. It looks like a blue with green undertones and I don't like them so I picked another one instead.
I made googly eyes with dotting tool and black and white polish. This manicure is so simple but it looks so cute. :)
 Nail Tek Foundation 2
Thumb: Orly - Pure Porcelain / 2 coats
Index: China Glaze - Sugar High / 2 coats
Middle finger: Essence - Sunny Side Up / 3 coats
Ring finger: Essence - Chuck / 2 coats
Pinkie: Essence - Replay! / 2 coats
Eyes: Dotting tool + Essence Stamp me! White & BPS  black stamping polish
Essie - Good to Go
Daylight
What do you think? :i Thanks for reading! :h

Xoxo,
Ivana :k

Sunday, April 22, 2012

Manicure inspired by Real Madrid C. F.

I'm a big fan of football and my all time favorite club is Real Madrid. I started watching football since 1998, I still remember the world cup I watched with my dad and I loved it. :D As a kid, I even played it with my friends, but I'm sad I never tried to train it. :/
Old team of Real Madrid with Ronaldo, Roberto Carlos, Zizu, Raul, Figo, Beckham, etc... made me fell in love with this club and it's still my #1. <3
Yesterday we watched another El Clasico (Barcelona vs. Real Madrid) and I tweeted if RM wins, I'm doing a manicure inspired by RM. :D And they won! :e So here's what I came up with.... 
Sun
I'm not good with free hand nail art so I decided to keep it simple. :D I used white as a base, because I love their white uniforms with gold details. I added a RM's logo on my ring finger with nail art brush and 3 gold stripes from their uniform as Adidas logo on my thumb with tape.

 
http://en.wikipedia.org
Daylight
OPI Nail Envy Nail Strengthener
China Glaze - Snow / 2 coats
Ring finger: China Glaze - 2030 (gold), Essence - Cool and the Gang (blue), Essence - Back to the 50's (red) + nail art brush
Thumb: China Glaze - 2030 + tape
Beauty Secrets Top Coat Fast Finish Polish Dryer

I wanted to add numbers of players but since I love the whole team, I decided to keep other nails just white. :D

Pictures aren't even close to good, because we had such a grainy (grey + rain) day and my camera didn't let me pick the gold without any shine. :( I like this mani better in person as on this pictures, kinda looks like a fail. :D 

Any Madridistas here? Do you watch football? What's your fave team? My 2nd fave team is Chelsea. :e I check almost all their matches (if I don't have time to watch it, I always check the results).What do you think? Does this mani look like a fail? :$

Have a lovely start of the week and thanks for reading!

Xoxo,
Ivana :k

Friday, April 13, 2012

Fish Egg Friday!

It's Fish Egg Friday! :e On Friday 13th we're posting Fish Egg Manicures. :v

I'm not going into any details about all this Fish Egg DRAMA, because I'm really avoiding those in this polish world (and I'm sure you already know what I'm talking about). Dashing Diva made this manicure back in February 2011 with black beads and the mani was named as a "caviar manicure". :)

I'm using micro beads from BPS, you can find them under the name 3D Steel Ball Glitter on their webpage. Or check your nearest craft store, you'll probably get them even cheaper. I only have 6 colors and you don't even need a lot to make a manicure like this so I still have a lot left. You're not limited with just one combo, you can mix them as you want so you can get any color combination you like. :D 

Because I already did a mixed manicure I decided to go with just one color and it looks like I made an Ombre Fish Egg Mani. :D I actually didn't even remove my last Leopard mani, so I just applied a fresh coat of matching base color and sprinkle the beads on. I didn't add any top coat because I remove it right after I took pictures. You can see a list of polish I used under the pictures... I know it's not perfect, because it was made in just couple of minutes but you get the idea. :D


 Thumb: China Glaze - Cheers to you / 1 coat + Silver 3D Steel Ball Glitter
Index: OPI - Lucky Lucky Lavender / 1 coat + Light Pink 3D Steel Ball Glitter
Middle: Confetti - Vava Voom / 1 coat + Pink 3D Steel Ball Glitter
Ring: H&M - Neon Lilac (mini) / 1 coat + Purple 3D Steel Ball Glitter
Pinkie: Rimmel - Blue my Mind / 1 coat + Plum 3D Steel Ball Glitter

This is my take of a Fish Egg manicure, but here you can see a list of bloggers who also just posted their manicures so be sure you'll check them all out. :)

Esther ~ Fab Fingertips
Jeanette ~ The Swatchaholic
A Lacquered Affair ~ A Lacquered Affair
Cristina ~ Let them have Polish!
Stephanie ~ Sincerely Stephanie
Tiffany ~ 2thelastdrop
Jen ~ The PolishAholic

Edit: I'm adding Inlinkz collection! I love Inlinkz! :) Add your Fish Egg Manicure right now! :)
So, what do you think about our Fish Egg Friday? :D 

Xoxo,
Ivana :k

Sunday, April 8, 2012

Happy Easter!

Happy Easter! <3

I hope you're having a wonderful Easter with the ones you love! And if you're not celebrating, then I hope you're having a relaxing Sunday. I didn't do anything special today. I wanted to paint my nails, I actually even did a couple of times but all I did was just a big mess. :i

Here's a picture I wanted to share with you. I did Pink Caviar Mani a while ago but I didn't check all the pictures I took. I don't know what happened here, but the beads came out so beautiful and unreal, so I wanted to share this colorful picture for today. <3


I'm also starting a personal challenge. I usually wear a manicure for a day or two, then I get bored and remove it. But now I'll give nail polish a chance to chip! So I'll wear it until it won't be ready to be removed. :D So no more naked nails! From time to time I don't know what to do with my nails, so I leave them naked or I do just one hand so I can show them to you. But now I'm going to do my both hands and I'll enjoy it! :D

How long do you leave your manicure on? Did you do an Easter Manicure?

Few more pics - here's Bebo in the action trying to catch a fish. :D

 Thanks for reading!

Xoxo,
Ivana :k

Wednesday, March 28, 2012

Pink Caviar Manicure

I'm sure you're already familiar with Caviar manicure, because I'm seeing it everywhere at the moment but in case you have no idea what I'm talking about, I'll tell you one more time. :P

Ciaté released a Caviar Manicure set, where you get a base nail polish and pearls aka beads. Long story short, great idea but the whole set is a bit overpriced. Okay, you get a tray and mini funnel to pour back all beads that fall down but you can put a tiny box under and make your own funnel from a piece of paper. :D The idea about caviar manicure is to pour pearls over wet polish, gently push them to stick even more and get a 3D manicure that looks like caviar. :D I think we all got same idea when we saw this set....
 
All you need are beads. I got mine on Born Pretty Store ages ago, search for 3D Steel Ball Glitter. This set costs a bit more than $5 and you get 12 colors so you can easily mix them together and get funny combinations. You can use my new code J10X31 to get 10% off. Btw... If this code will be used two times more, BPS will sponsor a giveaway. :)


Step 1: Apply a base color. Or if you already have nail polish on, you can just add a layer of top coat to have sticky surface. Do one nail at a time.
Step 2: When polish is still wet, put your finger over something that will catch fallen beads. Sprinkle beads over your nail to cover the whole surface.
Step 3: Gently push the beads down so they stick a bit more and you get rid of a beads that didn't stick to the nail.
Step 4: Apply a coat of top coat to seal the beads and make them "long lasting".
Daylight
I did my ring finger yesterday and it seems like the topcoat changed color to light pink so it looks like I did an accent nail. :P
Sun
 Base color: Essence TE Circus Circus - Cotton Candy
Mix of pink, light pink and purple 3d Steel Ball Glitters
Beauty Secrets TC Fast Finish Polish Dryer

I was done in less than 10 minutes, but I only did my left hand. I'm sure I'll do a full manicure once in the future, because it's really easy to make it.

My nails are super short, excuse me for that, but the final result looks funny and cute even on my nubs. :) So yes, no need to spend so much money on that set. :e You can mix as many color as you like so you're not limited with specific color combinations of beads, that's another plus!

What do you think? Do you like this new trend and idea about Caviar manicure? It's not super long lasting so I'd definitely wear it for special occasions or when you want to do something special. :D

Xoxo,
Ivana :k

Wednesday, March 14, 2012

I framed my nails with a sparkly glitter!

 Thanks for the lovely comments on my previous post and all suggestions you gave me are now on "to do list". :) It's absolutely great to hear what you think about my blog, what would you love to see from me, so it definitely gave me some ideas about my posts. :)

I was seeing manicure like this on Tumblr a couple of times and I was really interested to do it once. I actually did it once with studs but when I wanted them to seal with a TC the color came off and my manicure was ruined. But when genius Deniz from Emerald Sparkle did this manicure, I knew I should try it too. :D This is the manicure I'm still wearing and although I still have some swatches of two gorgeous polishes to show you, I need to show this one first. :i

I got so many compliments on this manicure, which always made my day. <3 It's so easy to make it, well all you need is a little bit of patience. :D First I didn't know what base color to pick but then I remembered Elsa's tweet that she would love to see a black mani with silver glitter. First I wanted to sponge a silver glitter but I really wanted to try this manicure out so I decided for black base and holographic glitter, I hope I won't disappoint you Elsa. :)

I started with a coat of Wet n Wild - Black Créme, best black polish ever. :) I didn't have patience to frame my nails with silver first so I decided to just place hexagonal silver holographic glitter around... I got glitter sample from Viva La Nails ages ago and I can't find them on their web page, but here you can see the glitters they have available at the moment. I'm not sure if they're thin like these I have but some colors really caught my attention. I prefer glitter over rhinestones, because they're thinner and the surface of a nail isn't bumpy as it would be with rhinestones.

I took a toothpick, put a layer of top coat and started placing the glitter around my nails. I was quickly done with my left hand but I have struggled a bit with my right hand, but I managed to place them as neatly as I could and I was very excited to see the lovely result. :)

Sun
Sun / Blurry
Daylight
 Nail Tek - Foundation 2
Wet n Wild - Black Créme / 1 coat
Silver holographic hexagonal Glitter
Beauty Secrets TC Fast Finish Polish Dryer

I like it better in person as on photos. :D My phone definitely see clearer than me, because those empty spots between glitter aren't so obvious and one of the line looks wonky but in person it looks just fine. :D It's so sparkly in person, I tried to show you all the rainbow going on on blurry picture but it's even more sparkly in person. :)

Let me know what do you think about these kinds of manicures. :) I love it this way but once I would love to have perfect framed nails just with nail polish but I think my hand isn't steady enough for perfect lines like that. :)

Thanks for reading!

Xoxo,
Ivana :k

Tuesday, January 17, 2012

Dots, Heart, Stripes & Cupcake Nail Art

Today I'm showing you another 2 products I got from Born Pretty Store - 15pc Nail Art Design Brush Set and Silver Stripping tape. I didn't have any ideas how to try them out so after a while I decided to do skittles manicure with different patterns so I could try different brushes and tape out.

Here's what I came up with. :$


Nail Tek - Foundation 2
Thumb: OPI - Sparrow me the Drama / 2 coats + White Acrylic Paint &amp + Star Fimo Slice; Longer Liner Brush
 Index: Ciaté - Fun Fair / 2 coats  + Farmasi - 031 + Sparrow me the Drama + Essence - Stamp me! White + Pink 3D Steel Ball Glitter + Pink Rhinestone & Smaller Painting Brush & Longer Liner Brush & Dotting Tool / Cupcake inspired by Simply Rins
Middle Finger: Essie - Splash of Grenadine / 2 coats + Essence - Very Berry + Farmasi - 031 + OPI - Sparrow me the Drama & Silver Stripping Tape
Ring Finger: Essence - Very Berry + White Acrylic Paint + Farmasi - 031 & & Smaller Drawing BrushThe Smallest Painting Brush & Dotting Tool/ Cartoon Heart inspired by Nailside
Pinkie: Farmasi - 031 / 2 coats + Essence - Stamp me! White & Dotting Tool
Beauty Secrets TC Fast Finish Polish Dryer

Unfortunately I didn't include my thumb in picture and it was already late to take another one. But I made vertical stripes with liner brush and added pink star fimo slice. :)

Brush set contains 15 brushes and you get: 3 drawing brushes, 7 painting brushes, 2 liners, 2 fan brushes and 1 dotting tool (see the picture below). As you can see I didn't try them all but just some of them and all I can say is that these brushes are really great for nail art. My freehand skills aren't phenomenal but sometimes I really want to try something out especially when I spot great tutorials, for example Jane's Cartoon Heart or Rina's Cupcakes. &lt;3 One of the drawing brush had wonky bristles so I cut them out and it was ready to use. All brushes have long handles and because I already have one with short handle I prefer that one over these, long handles make it harder to hold and paint details, but that's maybe just me. :) You get 15 brushes for less than a $5 - great deal if you're asking me. :D

I'll probably use drawing brushes and the smallest painting brush most of the times, but other painting brushes are also great for clean up. :) I know I can't leave without clean up brush and every time I loose it in my room, I'm going crazy but now I have lots of them. :) Those with more nail art skills would probably use all of them but I'm still not there. :P


I also got Silver Stripping tape. I used it on my ring finger. First I applied base color and when it was fully dried, I taped regular tape for a bottom line and then 2 pieces of stripping tape above. Stripping tape is self-adhesive so it stays on surface perfectly. Than I carefully painted rows between tape with different colors and removed the tape so I got 3 rows with different color. I could leave it like that, because I got a lovely tape manicure but I decided to add tape again for lovely detail. I added a coat of TC to seal it on the nail. :) You get one roll of tape and I think I'll have it for quite a long time. I'd suggest you that you keep it in that little plastic bag, because it's quite sticky on the sides, that's why my roll is full of dust. :/


Don't forget to use code IRJ61 to get 10% off on your order. ;)

My fave is probably the cupcake and I can't wait to make it again, probably as an accent nail. &lt;3 What do you think?  Would you wear a manicure like this or is it too girly for you? :P

Thanks for reading. :rainbow

Xoxo,
Ivana :k


*Some of the products in this post were sent to me by Born Pretty Store! For more information read my disclosure policy!

Sunday, January 8, 2012

Holiday Guest Post #12: So Nailed

I would like to say Hiiiiii to all new followers I got in those days. :$ I can't believe I'm at 986 now! Only 14 left to reach that magic 1000 I always dreamed about! :L I hope I'll be back with my nails soon, so you won't get bored and left me before I even start again. :P It's still a bit awkward for me to paint my nails so at the moment I still won't experiment much. :) 

We're having Stéphanie from So Nailed here today. We became great friends and I just love talking with her. <3 I'm so happy she decided to make another guest post for me, the first one was about Deborah Lippmann - Glitter in the Air. S. is very talented girl, who takes her pictures in totally different way than mostly of us, that's why I love her even more. Let's see what she has prepared for us...

Hello Lovelies ! 

It's my turn for a guest post on Ivana's blog !
So I'll present to you: My take on a nude half moon !

It's been a long while since I last posted, and I'm honored I that I may post on Iv's blog again !
We talked about doing a nude half moon a while ago, I tried out a couple of things; freehand, with those little white paper rings...
But I wanted something more special, more elaborated...

So for this manicure, I used 3 coats of Claire's 212, and then I cut out half moons out of those little lace stickers I got a while ago (from Réserve Naturelle, a french store I think)
I'm such a perfectionist, I wanted every sticker to have the same size, but I kinda failed :(
Haha and I lost one during 10 minutes, so yeah, that one didn't stick that well anymore (I hope it's not that noticeable)

I think this mani is very feminine and delicate, what do you think ?
It gives me kind of a spring feeling, which I need now
I love winter but here in Belgium, the weather was SUPER rainy, and that's not winter for me :(
Hopefully the weather is a lot better where you are ! 

Lots of love and kisses
Xx. S

I'm in love with your Half Moon Manicure. :L This is another way to make it, if you don't want to use polish to make your half moons, great job S. :) I think you send me these stickers too so I have to try this soon! But I must say that half moons look so much better on oval nails! Oh, sometimes I really want to file my nails oval, but I think it won't suit me. :$ 
Btw.... I totally want an Ipad now. :L You could be a hand model! You would sell me Ipad in a sec and I also would run to check your blog, I can see you're "reading" it when you're taking pics! :D 

Thank you so much for your lovely post S.! :k In case you never visited S.'s blog, check So Nailed and follow! But S. you should start posting more, we miss your posts! :i

I hope you all had a wonderful weekend! Thanks for reading. :i

Xoxo,
Ivana :k

Friday, December 30, 2011

Holiday Guest Post #8: Nothing Personail

Thank you so much for your lovely wishes. :party I had a great day and more to come on New Year's eve. :P I'm okay but my hand isn't, stitches were removed but my wound is still fresh and weird. :/ I hope it heals fast but what I already know that scar will be so gross. :/

We're having Abby from Nothing Personail here. <3 She's one of my favorite bloggers for sure. :) I won't even mention her long nail beds! :o Seriously, her nail beds are to die for so be sure you check her blog. Or you're missing stunning nails! ;)

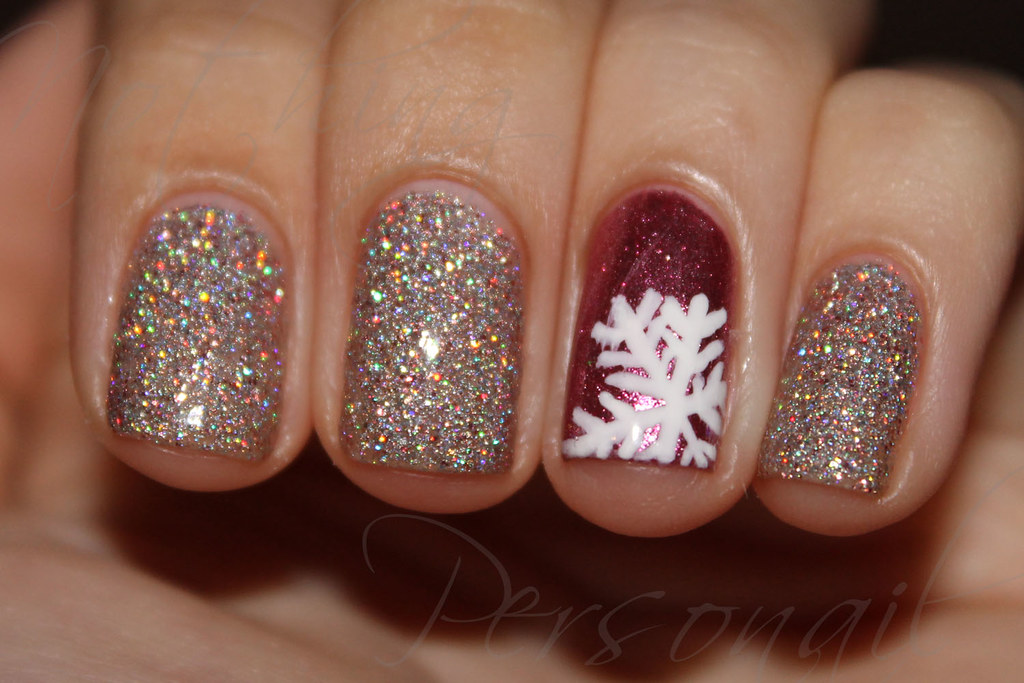
Hi guys! I am so excited to write this post! Ivana was my first follower (of course, she cheated because I'd been talking to her on the comments of one of her posts before I started blogging and gave her my link the moment it was ready ;) ) so writing this post means I've come full circle!

Ivana and I are always talking about random things, especially football. It's only unfortunate that her team (Real Madrid) is my team's (Barcelona) main rival. I like RM too but Barça has my heart (:  It's nice to have someone to talk about football with, especially during El Clásico :D

Anyway, as cliché as it sounds, I knew I had to do something pink for her. I'm not a huge fan of pink (sorry, Ivana), but I do keep a couple of pinks stashed for emergencies. Haha. Just like Marta, I decided to go for pink and Christmas. Or holidays, if you don't celebrate Christmas (:

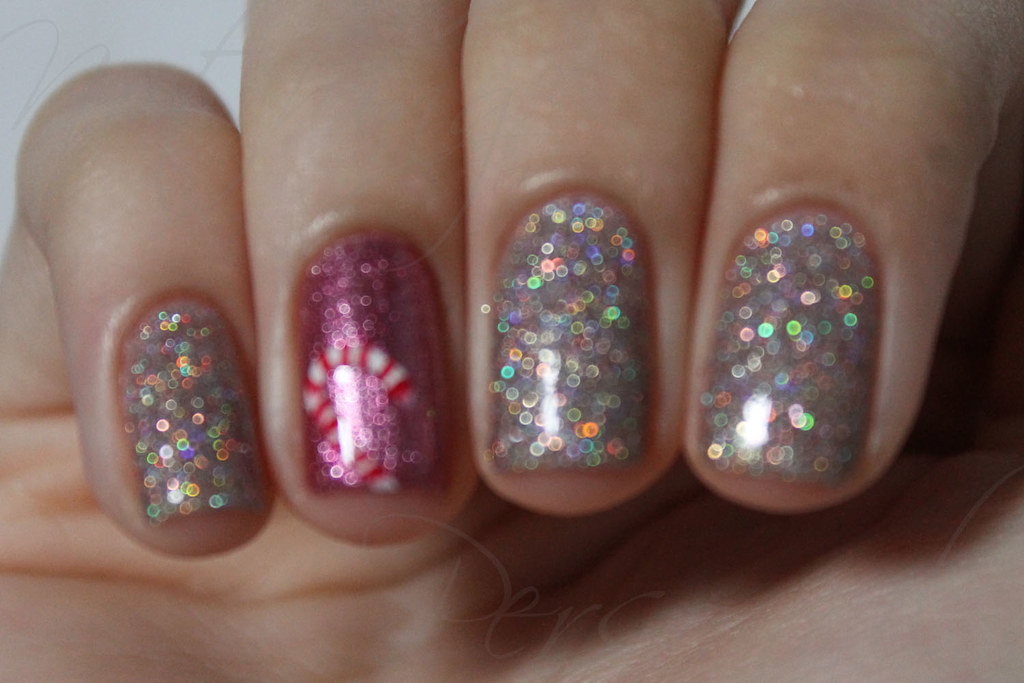
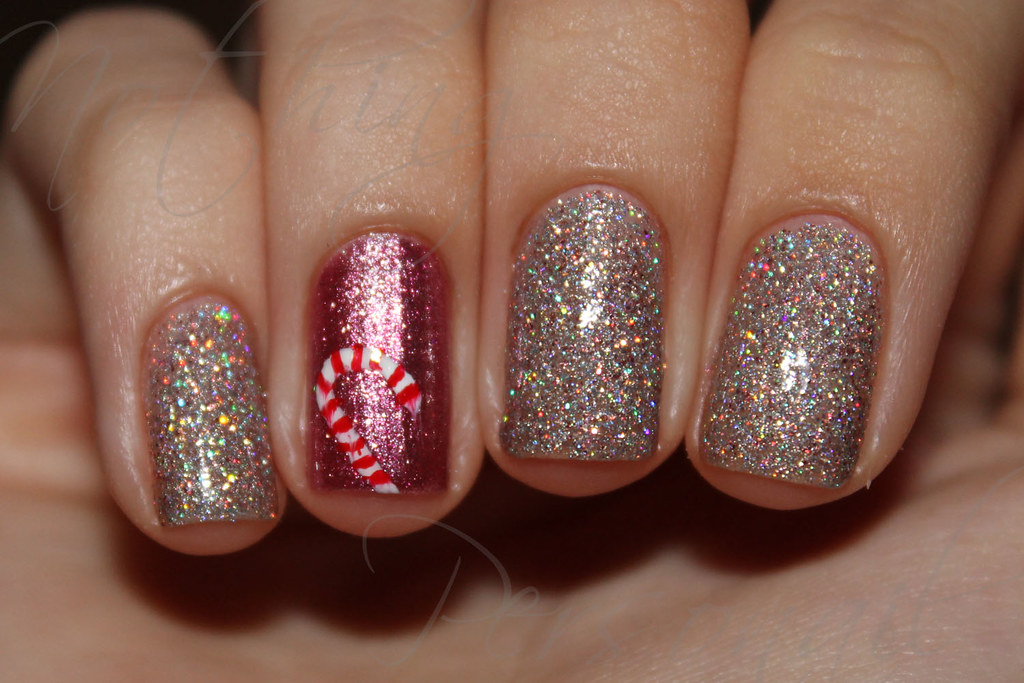
I used 2 coats of Color Club Magic Attraction and 2 coats of Boots 17 Milan for my accent nails. I then painted a snowflake on my left accent nail and a candy cane on my right accent nail using an old Sally Hansen French Manicure white (or tried to anyway). The red on the candy cane is Zoya Sooki. Mmmm look at all the holo glittery goodness :D

Christmas nails

Christmas nails

Christmas nails
Blurry to show the sparkles!

Color Club Magic Attraction

I hope you liked it! I got so many compliments on this manicure, people just love Magic Attraction! I wonder why ;)

I think Ivana will be back to polishing soon, I miss her nails! Thanks for reading and thanks for having me, Ivana! Happy (belated) birthday! <3


Thank you Abby for this lovely post. <3 You know I adore your nails, every color looks good on you, but I'm sure you know that. <3 I love your accents nails, so cute and look at this lovely rainbow. :rainbow

P.S.: I'm sorry, but we're winning next El Clásico. :$ And Cristiano Ronaldo just can't stop singing this song for you. :e

In case you don't know who Abby is, she's running her blog Nothing Personail. She didn't post much lately but I'm sure she'll be better in 2012? I want you to post more! <3

Let me know what do you think about this manicure and thanks for reading! I'm preparing my Top 10 polishes 2011 like last year but I have hard time to pick only 10. xD

Xoxo,
Ivana :k

Thursday, November 17, 2011

Studded Fancy Fuchsia

I'm so excited about this post. :i Let's start....

When I have to study, I find a million ways to distract myself away from books. I knew I need a manicure because my nails were naked for few days so I put on my favorite pink Fancy Fuchsia by Orly. I wore this color at least 5 times as manicure and also as pedicure. That happens rarely but there's something about this polish that makes me fall in love every time I apply it on nails. I have a back up bottle that's why I can wear it so many times. :$ Seriously, pink lovers you NEED this pink beauty! <3

When I applied it I saw a Sammy's tweet from The Nailasaurus talking about her studded manicure made in 31 Day Challenge. I didn't think twice so I pull out my silver 3D Steel Ball Glitter which I got from Born Pretty Store months ago. Well, I wanted to add black studs but I somehow managed to lost those 2 minutes after I found them in my drawer and I still don't know where I put them. xD

I placed studs differently as Sammy but not because I wanted to but because I wasn't paying attention how she put them on. :$

Daylight, light box


 Essence - Nail Art Protecting Base Coat
Wet n Wild - Clear Nail Protector
Silver 3D Steel Ball Glitte

First I applied Fancy Fuchsia on my nails, when the 2nd coat was still wet. I simply picked one by one stud with a toothpick and placed it on nail. :) If the base color was already dry, I put a layer of clear polish by Wet n Wild - Clear Nail Protector (which came with Wet n Wild - Prancer). I tried to put a layer of Essie - Good To Go to finish my manicure but I guess it's too thick for that, because I got lots of bubbles so I had to redo my ring finger. :) So use thin TC to avoid bubbling.

If you pick more than one stud on toothpick, remove the excess because if 2 studs fell on the wet surface, they're so hard to take off without ruining the base color. I wanted to do it faster but I almost messed up. xD Be patient! :)

It's so funny to touch your nails with those studs on. Surface is rough and it tickles.. xD Sometimes I scratched my face with them or my hair got caught but nothing too serious. They stayed on for 3 days, some of them fell down but there's still a silver dot and it wasn't so obvious that they weren't there anymore. 

Huh, I have a lot to say today. :$

As you can see - I took my pictures in "light box". Well, it's still not a light box, I got a daylight bulb and I make pictures with a black background under the lamp. Simple as that but when I'll have more time, I'll try to make something out. :) Please let me know what do you think about picture quality, do you like them or not, I'd love to hear your opinion.

Here's a bonus picture with our little kitty. <3 He was so curious what I'm doing so he joined me. :D He's very serious when it comes to nails. :P


Huh, this is a really long post but I hope you like it. :i Thanks for reading! :rainbow What do you think? Will you try it out? This manicure was so bright and so unique!

Nighty night,
Ivana :k