Friday, March 30, 2012

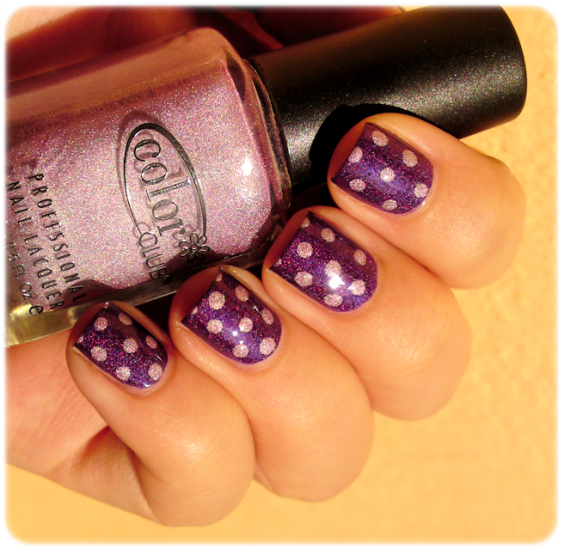
Polka Dot with Wild at Heart & Fashion Addict

I have one simple manicure for today. I wore it for few days and after I removed it I had to shorten my nails. :D But you saw my short nubs in my previous post. :P

I did Polka Dot manicure with WAH ages ago but this time I used Wild as Heart as a base. :D
Color Club - Wild at Heart & Fashion Addict
I made dots with Fashion Addict (unfortunately I don't have a holographic version of this beauty :( ) and a dotting tool. Easy and quick. :D

Sun
Nail Tek - Foundation 2
Color Club - Wild at Heart / 1 coat
Dots:  Color Club - Fashion Addict & Dotting Tool 
Beauty Secrets TC Fast Finish Polish Dryer

What do you think? Do you like Polka Dot pattern? I love it, because it's such a cute pattern! :) I have an image plate with dots but it's much easier to make dots with a dotting tool, at least for me. They're not super perfect but I'm still happy with the final result.

Have a lovely weekend dear readers and followers and thanks for reading! <3

Xoxo,
Ivana :k

Wednesday, March 28, 2012

Pink Caviar Manicure

I'm sure you're already familiar with Caviar manicure, because I'm seeing it everywhere at the moment but in case you have no idea what I'm talking about, I'll tell you one more time. :P

Ciaté released a Caviar Manicure set, where you get a base nail polish and pearls aka beads. Long story short, great idea but the whole set is a bit overpriced. Okay, you get a tray and mini funnel to pour back all beads that fall down but you can put a tiny box under and make your own funnel from a piece of paper. :D The idea about caviar manicure is to pour pearls over wet polish, gently push them to stick even more and get a 3D manicure that looks like caviar. :D I think we all got same idea when we saw this set....
 
All you need are beads. I got mine on Born Pretty Store ages ago, search for 3D Steel Ball Glitter. This set costs a bit more than $5 and you get 12 colors so you can easily mix them together and get funny combinations. You can use my new code J10X31 to get 10% off. Btw... If this code will be used two times more, BPS will sponsor a giveaway. :)


Step 1: Apply a base color. Or if you already have nail polish on, you can just add a layer of top coat to have sticky surface. Do one nail at a time.
Step 2: When polish is still wet, put your finger over something that will catch fallen beads. Sprinkle beads over your nail to cover the whole surface.
Step 3: Gently push the beads down so they stick a bit more and you get rid of a beads that didn't stick to the nail.
Step 4: Apply a coat of top coat to seal the beads and make them "long lasting".
Daylight
I did my ring finger yesterday and it seems like the topcoat changed color to light pink so it looks like I did an accent nail. :P
Sun
 Base color: Essence TE Circus Circus - Cotton Candy
Mix of pink, light pink and purple 3d Steel Ball Glitters
Beauty Secrets TC Fast Finish Polish Dryer

I was done in less than 10 minutes, but I only did my left hand. I'm sure I'll do a full manicure once in the future, because it's really easy to make it.

My nails are super short, excuse me for that, but the final result looks funny and cute even on my nubs. :) So yes, no need to spend so much money on that set. :e You can mix as many color as you like so you're not limited with specific color combinations of beads, that's another plus!

What do you think? Do you like this new trend and idea about Caviar manicure? It's not super long lasting so I'd definitely wear it for special occasions or when you want to do something special. :D

Xoxo,
Ivana :k

Saturday, March 24, 2012

Color Club - Wild at Heart

Finally it's time for nails! :) The other day I wanted to paint my nails but I just couldn't decide what to wear. So I tweeted and lovely Maria from Nails Made Simple suggested this one! Maria and Iris from Polish Amor ♥ are doing Twinsie Friday every week so for this Friday they choose Wild at Heart.You should all check how they use WAH. :)

I already tried Wild at Heart when I made my first Ruffian manicure but I never wore it alone, so I'm happy I finally did. Wild at Heart from Color Club is a dark violet  holografic polish and it's one coater! I did my both hands in few minutes what made me even more happy! :e I can work on my manicure for hours but sometimes I just don't have patience so onecoaters always make me happy.

Sun - Blurry
Sun
Nail Tek - Foundation 2
Color Club - Wild at Heart / 1 coat

 I fell in love with this polish - again and I'm so happy I own it! <3 What do you think? Do you have it? :)

I know Maria loves Carmelo aka Bebo so I decided to include a photo of him I took yesterday. :) It's so sunny here so he's spending a lot of time outside on our balcony playing, catching bees, ants,... Well everything that moves around.


Hope you're having a great weekend dear readers and followers and thanks for reading! This is my 401st post I published on this blog, I can't believe this! :o Time flies by just too fast and I should post more often. We'll see, as always I'll do my best. :)

Xoxo,
Ivana :k

Friday, March 23, 2012

Haircut with CreaClip

It's been a week since I published a post, oops. :$ My nails were and still are naked, maybe I'll do something with them tonight, we'll see. :) Anyway I've something else for you for today. 

2 days ago I got CreaClip in my mail and I had to try it asap. If you don't know what CreaClip is, here's a description from their site: "The CreaClip is a hair-cutting guide that you can use at home to cut your own or others’ hair. It is easy to use: Just Clip, Slide, and Cut!" Sounds easy, right? I spotted their videos on YouTube while browsing "How to cut layers" videos. I actually tried to cut my front hair in layers but I failed so I couldn't wait to get my CreaClip to fix it. :D

My hair has been long for few years now. All my hair was same lenght since I cut them to shoulders 3,5 years ago so when they got longer, I lost all the volume I had, because my hair is a bit thick and heavy. I'm usually very disappointed with my hair dressers, so going to the hair dresser was always a nightmare for me - or they didn't do what I wanted or they're expensive. :/ 
Last time I had a haircut was half year ago, when I wanted to get layers but the hairdresser convinced me to not cut a v-shape, because my hair is thick and it'd be such a pity to cut it off. So she cut my hair just a bit in u-shape. Blah blah blah... I wish I didn't listen to her. :D 

Okay, let's talk about CreaClip now. :D You get 2 CreaClips in 2 sizes. The bigger curved one (white on the picture below) is for layers and long hair, the smaller (blue) is for bangs and short hair.


All the magic is in the bubble. It works like a bubble level. You just have to be sure the bubble is in the middle, that means you'll cut it straight. :) Here's a close up of the blue one. The white is just bigger and curved. :)


Teeth inside combs the hair while you slide it down and it also helps to keep hair in place when you're cutting it. :) CreaClip comes with instructions but I prefer video instructions, so I checked almost all videos on their youtube channel and decided to cut layers. Here's how I did it.

Step 1: First I straighten my hair, because my natural hair is a bit wavy. 
Step 2: Then I flipped my head over and brushed my hair just to be sure I don't have any knots or tangles. When my hair was smooth I took a bigger white CreaClip and clip it on my hair with curve facing down. The bubble was facing towards me so I could see it but if someone cut your hair, you shout face it out.
Step 3: I waited few seconds to see where the bubble is. If the bubble wasn't in the middle, I tried to get it in the middle by slowly moving left or right end of the CreaClip down, depends where the bubble is.
Step 4: When I got bubble in the middle, I slowly slide it down checking the bubble was still in the middle, to lenght I wanted to cut. Here's how it looked. :)

Step 5: Just cut it. :D You can cut vertically or horizontally. I cut it vertically, because I wanted more textured look.
Step 6: Open the CreaClip, put your head back and see the final result. :P

For before and after pictures, click read more. :D

Friday, March 16, 2012

OPI DS Temptation

Temptation is part of OPI's Designer Series, which was released with DS Bold I think. I didn't want Bold, because I have Mrs. Claus (China Glaze) which is supposed to be its dupe, but I wanted this badly. :i I got this polish from Iris and I'm so happy she found it for me. <3 There's a lot of going on in this polish: navy dark sheer base with lots of blurple, purple and silver glitter.

When you check google photos of this beauty, you'll find lots of color inaccurate pictures, probably because this blurple is so hard to catch. I have so many photos where Temptation looks way to blue as in real. :/ You should definitely see this polish in person, so you'll know what I'm talking about. :D

Glitter in Temptation is very dense so 2 coats were enough. :) I wish it lasted longer, but next day after long shopping my nails were chipped. :/ I still didn't find a way to wear glitters longer, because usually the whole nail come off. :/ Maybe I should layer it over similar creme color so the glitter could have something under to stick better? Any tips?

Sun
Daylight
Nail Tek - Foundation 2
OPI - DS Temptation / 2 coats
Beauty Secrets TC Fast Finish Polish Dryer

Sometimes it looks more purple and sometimes more blue, depends on lightning. But I just simply adore this polish! <3

What do you think about this polish? Do you like it and own it?

Xoxo,
Ivana :k